
I had the best day ever on Saturday! I went to another Pizza Box Scrapbooking event at Tiny's Hobby in Kortrijk, Belgium. In this Pizza Box, we got Simple Stories, Posh collection. Well, some stuff from the collection. It sure is a super, super collection. I love the colours and the lack of a theme.
Keep reading for more inspiration and a few tips.

The morning of the event, I hit up Pinterest and drew some sloppy sketches from layouts I liked. Although Tiny's always provides a lot of pages, I have this thing with scrapping the exact same thing as my neighbour. Hehehe...I do realise that is a great idea for those who don't even know where to get started. The ladies are always there to help, too.

There was a paper with these pretty hearts. I left a sticker type of edging on them and placed them to form a flower. Give your pedals a little push forward or back for added dimension and depth on your page.
Layering is also a great way to add colour, texture, softening a page and adding pop and contrast to make particular aspects of your page stand out more than others.
I finished off my flower with a huge button brad I bought at the Action for next to nothing. I kept bending the prongs until they fell off and used a thick glue dot to adhere.
I thought it would be pretty cool to use the circle in the camera as another photo spot, but I didn't bring pictures. I didn't start organising early enough. I also didn't bring a lot of card stock and none of my ribbons matched. Hehehe...The things I should learn by now! Hehehe...
The layered up tag on the above layout will provide an excellent spot for a title.

Here's my second page. Reverse layering for extra interest and more of the same neat shaped flowers so I could place these two pages side by side for a posh, coordinating double page layout.

This time I added some leaves under the flower. I just drew this shape and traced it for all of the others so they were all basically the same. Then I inked around the edges to make them contrast more against the background.
These clear stickers were really nice. I backed it up with some coordinating scraps I had, inked around the edges again for a cohesive look with the rest of the page, added this tiny, fine gold cord because this entire collection seems a bit fine and dainty and then topped off the cluster with these hearts. I took a tiny glue dot and rolled it up so that hearts would be higher than the mason jar, lending more depth to my page AND you don't see the adhesive.

I just love all of the bling. So, I added a bit more with my own bling from Action. A bit of pretty, gold script from the collection and coordinating hearts to polish it up.

This is what the basic kit looks like. Sweet, eh?!
Thanks for hanging with The Cherry.
Here are a few of our other traditional projects: They are linked.
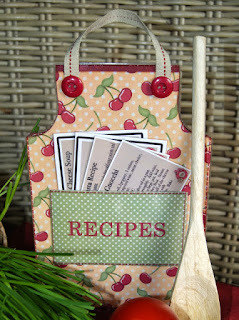
I LOVE this project. I've got a FULL TUTORIAL and a FREE TEMPLATE for you. Maybe you could still use a gift idea?
This project was really fun, easy and fast. There's a full tutorial and another free template so you can scrap this up, too.
Needing a party favour holder or just LOVE shoes? Try out this project. I have a tutorial and a link for the free template.

We had several weeks worth of card ideas. Here was one of my favourites. Scrap fast and economically with the stash you already have and by all means, save those cards.

Graphic 45 is one of my favourite paper suppliers. Check out what I did with a cereal box and just a few scraps of paper.

If you like what you see, Follow us here, on Pinterest and on Facebook. I've also got a group if you want to show off your projects there, too.
Happy scrapping!!!
No comments:
Post a Comment