
Welcome to The Cherry On Top.
Saturday is our day to feature hybrids and today, we've got a great one. One of my biggest issues as a digital scrapper is getting my designs from the screen, into my hands. I'm finding it a bit unfulfilling keeping everything on the screen. We've got a great solution for that. It's free, fast and really easy. What more could you ask for?
So keep reading to find out how you can use February's Cute Cards to create a mini album for your Valentine, for you or someone special. If you are wanting the png version of these cards, click here.


First, download the Cute Cards and print them out. Make sure they are the size you want. Print out the pictures you would like to use for on the back of the pages/cards and adhere them to the opposite side of the Cute Cards. You could use some scrap papers and layer them up if you choose.
An option is to punch holes in one of the top corners or the centre, then simply place a coordinating brad through all of the pages and that's it! Keep the brad just a bit loose so the pages are easy to move. You could use ribbon, string, a metal ring...
For my frist mini, for JJ, my youngest, I kept his book very simple. I used a heavier weight paper for the Cute Cards to make it more rigid, cut out the photos, through the years, that I thought he'd like the best, rounded the corners of the pictures and applied the photos to the back of my Cute Cards.
Then punched the holes in the top left corner and added the coordinating, blue brad. His favourite colour. This mini was seriously whipped up in 17 minutes from start to finish. You could also laminate your pages if you choose.

For my oldest's I wanted to try my ribbon method that I considered in our custom planner. It looks so pretty when you use a wider ribbon. You can check that out, here.
Here's how I did Liam's album. I punched two holes, evenly separated on each Cute Card. I got the first one how I wanted it and then used it as a template for the next and so forth. I recommend not using the same one over and over again or the holes will be a bit wider then the rest of the other pages.
You can see how I layered up my papers on these cards for Liam's album.

Find some coordinating string, cord or ribbon for your binding. I chose this lovely bright red string that wasn't too wide. My holes are pretty small. Thread through your holes on each page.
The next step is bring the ribbon, string or whatever you are using through the next set of holes. Look at our illustration. You can choose to have the tying of the bow on the front or the back of your mini. I went for the front and just tied these ends into nice bow. You could embellish further is you like.
Keep the string just a bit loose and the pages will turn easily. See! I used pics from when they were really small, a bit bigger, bigger and then most recent. I had Liam choose the photos he liked best from a pool of choices.


Saturday is our day to feature hybrids and today, we've got a great one. One of my biggest issues as a digital scrapper is getting my designs from the screen, into my hands. I'm finding it a bit unfulfilling keeping everything on the screen. We've got a great solution for that. It's free, fast and really easy. What more could you ask for?
So keep reading to find out how you can use February's Cute Cards to create a mini album for your Valentine, for you or someone special. If you are wanting the png version of these cards, click here.

You could use them digitally, like we did here on this digital layout.

We're even providing you with the free quick page. All you have to do is plug in your photos.
You could just print this out in a 4x4, 6x6 or 8x8 format.
Or you could make a mini. See how we made two different minis with the Cute Cards.
First, download the Cute Cards and print them out. Make sure they are the size you want. Print out the pictures you would like to use for on the back of the pages/cards and adhere them to the opposite side of the Cute Cards. You could use some scrap papers and layer them up if you choose.
An option is to punch holes in one of the top corners or the centre, then simply place a coordinating brad through all of the pages and that's it! Keep the brad just a bit loose so the pages are easy to move. You could use ribbon, string, a metal ring...
For my frist mini, for JJ, my youngest, I kept his book very simple. I used a heavier weight paper for the Cute Cards to make it more rigid, cut out the photos, through the years, that I thought he'd like the best, rounded the corners of the pictures and applied the photos to the back of my Cute Cards.
Then punched the holes in the top left corner and added the coordinating, blue brad. His favourite colour. This mini was seriously whipped up in 17 minutes from start to finish. You could also laminate your pages if you choose.

For my oldest's I wanted to try my ribbon method that I considered in our custom planner. It looks so pretty when you use a wider ribbon. You can check that out, here.
Here's how I did Liam's album. I punched two holes, evenly separated on each Cute Card. I got the first one how I wanted it and then used it as a template for the next and so forth. I recommend not using the same one over and over again or the holes will be a bit wider then the rest of the other pages.
You can see how I layered up my papers on these cards for Liam's album.

Find some coordinating string, cord or ribbon for your binding. I chose this lovely bright red string that wasn't too wide. My holes are pretty small. Thread through your holes on each page.

So you end up like pictured, below.
The next step is bring the ribbon, string or whatever you are using through the next set of holes. Look at our illustration. You can choose to have the tying of the bow on the front or the back of your mini. I went for the front and just tied these ends into nice bow. You could embellish further is you like.
Keep the string just a bit loose and the pages will turn easily. See! I used pics from when they were really small, a bit bigger, bigger and then most recent. I had Liam choose the photos he liked best from a pool of choices.

Voila! Two mini's made very easily and with the stash you have, saving you money.

I don't know if you saw a tutorial on how you use aluminium foil to sharpen your punches? I tried it and it did not work at all. I was very relentless and kept trying and trying, but the corners still came out like...

This.
Doesn't cut at all. Not even on better paper.

If you've got a better solution besides buying a new punch, let's hear it.
If you're digging the colours of our free February goodies, you may be interested in this mini we are offering on our Facebook Page. Make a comment on the right status and we'll send you the link. Sorry, you missed out on this one! Sign up for the newsletter so you don't miss the awesome free stuff.
This is our most recent freebie. It's a free, cluster frame template. Click on the image to get it.
That's our hybrid for you, today.
Love hybrids? Check out our two before this or look at our Pinterest board, The Cherry On Top's Freebies and find them all in one convenient place. We do have a search option, to the top right of the blog is you like.
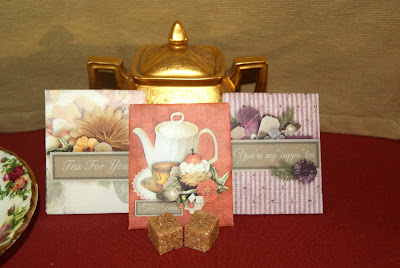
These lovely free printable tea envelopes.
Coffee cup tags and card with gift card pocket.
Enjoy our Personal Use ONLY freebies.
Happy scrapping and thanks for hanging with The Cherry!